This post is the first part of the Robotics/DuckieTown series.
The Computing Science PhD program at the UofA requires students to take a few courses. Currently, I’m taking a robotics course, and in this course, we’re working with DuckieTown. DuckieTown is a miniature city where autonomous vehicles, DuckieBots, are the main form of transportation for the citizens of DuckieTown: rubber ducks 🦆. In particular, we’re working with the DB21 DuckieBot.

Building the Duckiebot
Before we can autonomously drive rubber ducks around, we need to build the DuckieBot (which is somewhat obvious). The instructions for the DB21 are not super straightforward. Particularly, they don’t identify parts correctly. For example, in the instructions they use a picture to identify each different screw but there’s no indication on the actual bags of screws which is which.
Once I had finished building the bot, I noticed something unusual: the display would come on for a second, then shut off for a few seconds and repeat this indefinitely. I figured I just had a faulty display and decided to continue on with actually trying to get the bot to drive around the room.
When I loaded up the keyboard controls for the bot though, the thing wouldn’t drive! I spent a number of hours trying to figure this out. I re-flashed the SD card and firmware for the HUT controller, but still the thing didn’t want to drive. After a while, I decided to see if I could access the camera of the device, and I couldn’t. The camera was not publishing images. So, I abandoned trying to figure out why the bot wouldn’t drive in order to figure out why the camera wasn’t working.
Eventually, I realized that I had attached the camera incorrectly. When attaching the camera to the Jetson Nano, the cord is actually required to be twisted around, which is not really shown well in the instructions: 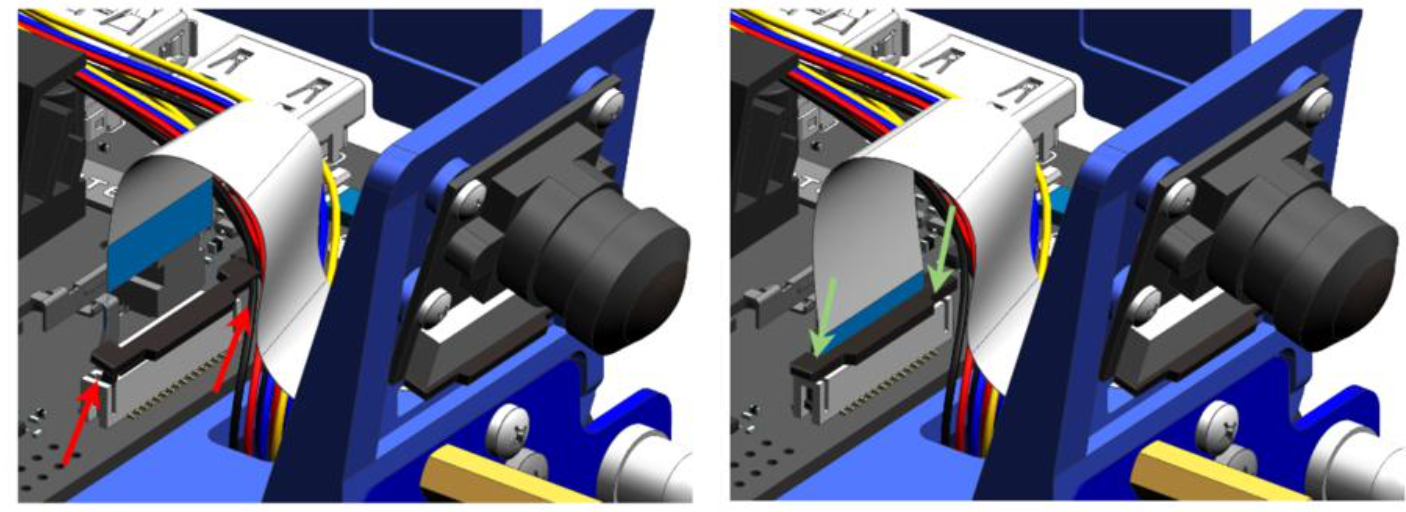 because of this, my camera couldn’t communicate with the bot (in fact, the camera couldn’t even turn on because it had no power). After I attached the camera correctly, all my problems were fixed! I could access the camera, the display stopped flickering, and I could drive my DuckieBot!

Driving in a Straight Line
The next step is to calibrate the wheel motors. Each motor is slightly different due to manufacturing, how its connected to the DuckieBot, and a plethora of other reasons. Calibrating ensures that the wheels each turn at the same rate, meaning that when you tell the bot to move forward it will move forward and won’t veer to the side. Without calibration, the bot will slowly drift to the side when driving. Here’s a video of what it looks like when the wheels are not calibrated:
Note that in the video, I’m telling the bot to drive straight forward. Notice how the DuckieBot veers to the side when driving. This is because the wheels are not calibrated. Now here’s a video of the DuckieBot driving straight forward after wheel calibration:
Lane Following Demo
The DuckieTown shell (accessed using the dts command) comes with a lot of demo programs to control your DuckieBot. There’s one demo program where the DuckieBot attempts to drive forward whilst staying in its lane. Here’s my DuckieBot running this demo program:
Creating and Running Python Programs on the DuckieBot
After I had built the DuckieBot and could control it, I went on to the next part of the instructions on Basic Development, which outlines how to develop Python packages to run on your DuckieBot using dts.
The goal is simple: print Hello from <DuckieBot Name> to the screen using a dts project. First, we need to create a repository from the DuckieTown project template. Then, clone the repository locally and cd into it. Then, we run the following commands to set up the package:
1
2
3
4
5
6
7
$ mkdir -p packages/my_package
$ touch packages/my_package/__init__.py
$ cat > packages/my_package/my_script.py <<EOF
import os
message = "Hello from %s!" % os.environ['VEHICLE_NAME']
print(message)
EOF
Then, in the Dockerfile, you update the REPO_NAME, DESCRIPTION, and MAINTAINER ARGs. Finally, in the launchers/default.sh file you should change this line:
1
echo "This is an empty launch script. Update it to launch your application."
to this:
1
dt-exec python3 -m "my_package.my_script"
The program should run on the DuckieBot. I attempted to use the following command to build the program on the DuckieBot as outlined in the instructions:
1
$ dts devel build -f --arch arm32v7 -H MY_ROBOT.local
Did it work? Nope! Instead, I got an Error 500: Server Not Found. Yet, I could ping my DuckieBot successfully! How strange! This one took a long time to figure out, and many other students in the class also experienced this issue. To fix it, we simply removed the Docker login credentials from the ~/.dt-shell/config.yaml. After that, we could successfully run our program on the DuckieBot using the following two commands:
1
2
$ dts devel build -f --arch arm64v8 -H MY_ROBOT.local
$ docker -H MY_ROBOT.local run -it --rm --net=host duckietown/my-program:latest-arm64v8
Colour Detector
The next part of the instructions gets you to write a piece of software that looks through the DuckieBot camera and prints out a distribution of the colours the camera sees. The instructions give a small code snippet to help you get started:
1
2
3
4
5
6
7
8
9
10
11
12
13
14
15
16
17
18
19
20
21
22
23
24
25
26
27
28
29
30
31
32
33
34
35
36
37
38
39
40
41
42
43
44
#!/usr/bin/env python3
import cv2
import numpy as np
from time import sleep


def gst_pipeline_string():
    # Parameters from the camera_node
    # Refer here : https://github.com/duckietown/dt-duckiebot-interface/blob/daffy/packages/camera_driver/config/jetson_nano_camera_node/duckiebot.yaml
    res_w, res_h, fps = 640, 480, 30
    fov = 'full'
    # find best mode
    camera_mode = 3  #
    # compile gst pipeline
    gst_pipeline = """ \
            nvarguscamerasrc \
            sensor-mode= exposuretimerange="100000 80000000" ! \
            video/x-raw(memory:NVMM), width=, height=, format=NV12,
                framerate=/1 ! \
            nvjpegenc ! \
            appsink \
        """.format(
        camera_mode,
        res_w,
        res_h,
        fps
    )

    # ---
    print("Using GST pipeline: ``".format(gst_pipeline))
    return gst_pipeline


cap = cv2.VideoCapture()
cap.open(gst_pipeline_string(), cv2.CAP_GSTREAMER)

while(True):
    # Capture frame-by-frame
    ret, frame = cap.read()
    # Put here your code!
    # You can now treat output as a normal numpy array
    # Do your magic here

    sleep(1)
As well as a Dockerfile:
1
2
3
4
5
6
FROM duckietown/dt-duckiebot-interface:daffy-arm64v8
WORKDIR /color_detector_dir
COPY requirements.txt ./
RUN pip install -r requirements.txt
COPY color_detector.py .
CMD python3 ./color_detector.py
If you have these two files, you can build the program on your DuckieBot and then run it on your DuckieBot using:
1
2
$ docker -H DUCKIEBOT_NAME.local build -t colordetector .
$ docker -H DUCKIEBOT_NAME.local run -it --privileged -v /tmp/argus_socket:/tmp/argus_socket colordetector
What’s Wrong with the Camera?
If you just run this program on you DuckieBot, you’ll get an error. The source of this error took me a while to find. The error message notes that sensor-mode cannot be set. What’s wrong?
The gst_pipeline string above is created incorrectly. The call to .format() won’t actually work as above because it doesn’t specify where to put the camera_mode, res_w, res_h, and fps, variables in the gst_pipeline string. Instead you can use the following to create the gst_pipeline string:
1
2
3
4
5
6
7
8
gst_pipeline = f""" \
	nvarguscamerasrc \
	sensor-mode={camera_mode} exposuretimerange="100000 80000000" ! \
	video/x-raw(memory:NVMM), width={res_w}, height={res_h}, format=NV12,
		framerate={fps}/1 ! \
	nvjpegenc ! \
	appsink \
"""
After that, you should be able to successfully create the cv2.VideoCapture object using the fixed gst_pipeline string.
What’s Wrong with the Image?
Okay, once I had sorted that out I could successfully get an image from the camera:
1
2
3
4
5
6
cap = cv2.VideoCapture()
cap.open(gst_pipeline_string(), cv2.CAP_GSTREAMER)

while(True):
    ret, frame = cap.read()
    sleep(1)
a few stacktraces later, and I realized there was something wrong with this code as well. The frame variable should’ve been a array of size (640, 480, 3), but instead it had size (1, n), where n was seemingly random, and changed after each read from the camera. I spent hours looking into the DuckieBot documentation to figure out why this was the case, but the documentation didn’t mention anything about this. Finally, I decided to jump into some DuckieTown source code. Maybe I could see how they read images from the camera, and that would give me a few hints.
It turns out, you need to use OpenCV to decode the frame variable using the imdecode function: frame = cv2.imdecode(frame, 1), which will then return the proper (640, 480, 3) BGR image. It’s quite strange that this wasn’t mentioned anywhere in the documentation,.
Writing the Colour Detector
Now that I could read images from the camera, I went on to write the colour detection part. How it works is every second, I read an image from the camera, then split that image into N_SPLITS horizontal bands, where N_SPLITS is an environment variable. Then, for each horizontal band, I report the distribution of RGB and HSV values for each pixel in the image along with some useful summary statistics. I then look at the modes of the distributions of hue, saturation, and value and predict whether the colour (hue mode, saturation mode, value mode) is gray, black, white, blue, cyan, yellow, green, red, or magenta. Of course, this colour may not even be present in the image, but is a fun way to summarize the image into a single colour. Here’s a screenshot of this colour detector program:

You can grab this program and try it out with DockerHub: sfneuman/colordetector:latest
Source Code
If you’d like to adapt this colour detector program, here’s the source code:
1
2
3
4
5
6
7
8
9
10
11
12
13
14
15
16
17
18
19
20
21
22
23
24
25
26
27
28
29
30
31
32
33
34
35
36
37
38
39
40
41
42
43
44
45
46
47
48
49
50
51
52
53
54
55
56
57
58
59
60
61
62
63
64
65
66
67
68
69
70
71
72
73
74
75
76
77
78
79
80
81
82
83
84
85
86
87
88
89
90
91
92
93
94
95
96
97
98
99
100
101
102
103
104
105
106
107
108
109
110
111
112
113
114
115
116
117
118
119
120
121
122
123
124
125
126
127
128
129
130
131
132
133
134
135
136
137
138
139
140
141
142
143
144
145
146
147
148
149
150
151
152
153
154
155
156
157
158
159
160
161
162
163
164
165
166
167
168
169
170
171
172
173
174
175
176
177
178
179
180
181
182
183
184
185
186
187
188
189
190
191
192
193
194
195
196
197
198
199
200
201
202
203
204
205
206
207
208
209
210
211
212
213
214
215
216
217
218
219
220
221
222
223
224
225
226
227
228
229
230
231
232
233
234
235
236
237
238
239
240
241
242
243
244
245
246
247
248
249
250
251
252
253
254
255
256
257
258
259
260
261
262
263
264
265
266
267
268
269
270
271
272
273
274
275
276
277
278
279
280
281
282
283
284
285
286
287
288
289
290
291
292
293
294
295
296
297
298
299
300
301
302
#!/usr/bin/env python3
import cv2
import numpy as np
import scipy.stats as st
import os
from time import sleep
import sys

N_SPLITS = int(os.environ["N_SPLITS"])
BINS = int(os.environ["BINS"])
MAX = int(os.environ["MAX"])
if MAX < 5:
    raise ValueError("MAX should be > 5")


def format_title(title):
    if title == "Red":
        return "\x1b[1;31m"
    elif title == "Green":
        return "\x1b[1;32m"
    elif title == "Blue":
        return "\x1b[1;34m"
    elif title == "Hue":
        return "\x1b[1;33m"
    elif title == "Val":
        return "\x1b[1;35m"
    elif title == "Sat":
        return "\x1b[1;36m"
    else:
        return ""


def print_hist(hist, title=""):
    height, bins = hist
    lines = []

    # Create the title
    length = (len(height) + 1) * 2
    spaces = (length - len(title)) // 2
    rem = length - (spaces * 2 + len(title))
    lines.append(format_title(title) + " " * spaces + title + " " * spaces +
                 " " * rem + "\x1b[1;0m")

    lines.append("⎢" + " " * (length - 2))

    for i in range(MAX, 0, -1):
        line = "⎢"

        for j in range(len(height)):
            if height[j] < i:
                line += "  "
            else:
                line += "█ "
        lines.append(line)

    lines.append("__" * (len(bins) - 1) + "_")
    return lines


def print_hsv_stats(hsv_img):
    h, s, v = hsv_img[:, :, 0], hsv_img[:, :, 1], hsv_img[:, :, 2]

    mean_h = np.mean(h)
    median_h = np.median(h)
    mode_h = st.mode(h.ravel()).mode.item()
    max_h = np.max(h)
    min_h = np.min(h)

    mean_s = np.mean(s)
    median_s = np.median(s)
    mode_s = st.mode(s.ravel()).mode.item()
    max_s = np.max(s)
    min_s = np.min(s)

    mean_v = np.mean(v)
    median_v = np.median(v)
    mode_v = st.mode(v.ravel()).mode.item()
    max_v = np.max(v)
    min_v = np.min(v)

    hue = format_title("Hue")
    sat = format_title("Sat")
    val = format_title("Val")
    lines = (
        f"     {hue}   Hue\t{sat}Sat\t{val}Val\n\x1b[1;0m",
        "        |------------------------",
        f"Mean    |  {mean_h:3.0f}\t{mean_s:3.0f}\t{mean_v:3.0f}",
        f"Median  |  {median_h:3.0f}\t{median_s:3.0f}\t{median_v:3.0f}",
        f"Mode    |  {mode_h:3.0f}\t{mode_s:3.0f}\t{mode_v:3.0f}",
        f"Max     |  {max_h:3.0f}\t{max_s:3.0f}\t{max_v:3.0f}",
        f"Min     |  {min_h:3.0f}\t{min_s:3.0f}\t{min_v:3.0f}",
    )

    return lines, mode_h, mode_s, mode_v


def print_rgb_stats(img):
    b, g, r = img[:, :, 0], img[:, :, 1], img[:, :, 2]

    mean_r = np.mean(r)
    median_r = np.median(r)
    mode_r = st.mode(r.ravel()).mode.item()
    max_r = np.max(r)
    min_r = np.min(r)

    mean_g = np.mean(g)
    median_g = np.median(g)
    mode_g = st.mode(g.ravel()).mode.item()
    max_g = np.max(g)
    min_g = np.min(g)

    mean_b = np.mean(b)
    median_b = np.median(b)
    mode_b = st.mode(b.ravel()).mode.item()
    max_b = np.max(b)
    min_b = np.min(b)

    red = format_title("Red")
    green = format_title("Green")
    blue = format_title("Blue")
    lines = (
        f"     {red}   Red\t{green}Green\t{blue}Blue\t\n\x1b[1;0m",
        "        |------------------------",
        f"Mean    |  {mean_r:3.0f}\t{mean_g:3.0f}\t{mean_b:3.0f}",
        f"Median  |  {median_r:3.0f}\t{median_g:3.0f}\t{median_b:3.0f}",
        f"Mode    |  {mode_r:3.0f}\t{mode_g:3.0f}\t{mode_b:3.0f}",
        f"Max     |  {max_r:3.0f}\t{max_g:3.0f}\t{max_b:3.0f}",
        f"Min     |  {min_r:3.0f}\t{min_g:3.0f}\t{min_b:3.0f}",
    )

    return lines


def convert_to_range(hist):
    return (
        np.round(
            (hist[0].max() - hist[0]) / (hist[0].max() - hist[0].min()) * MAX,
        ),
        hist[1],
    )


def print_img_data(bgr_im, step):
    hsv_im = cv2.cvtColor(bgr_im, cv2.COLOR_BGR2HSV)
    data = []
    for j in range(0, N_SPLITS):
        bgr_img = bgr_im[j:j+int(step), :, :]
        hsv_img = hsv_im[j:j+int(step), :, :]
        b, g, r = bgr_img[:, :, 0], bgr_img[:, :, 1], bgr_img[:, :, 2]
        h, s, v = hsv_img[:, :, 0], hsv_img[:, :, 1], hsv_img[:, :, 2]

        # For information on colour boundaries, I referenced:
        # https://docs.opencv.org/4.x/df/d9d/tutorial_py_colorspaces.html
        #   #:~:text=For%20HSV%2C%20hue%20range%20is,need%20to%20normalize
        #   %20these%20ranges.
        r_hist = np.histogram(r, range=(0, 255), bins=BINS)
        g_hist = np.histogram(g, range=(0, 255), bins=BINS)
        b_hist = np.histogram(b, range=(0, 255), bins=BINS)
        h_hist = np.histogram(h, range=(0, 179), bins=BINS)
        s_hist = np.histogram(s, range=(0, 255), bins=BINS)
        v_hist = np.histogram(v, range=(0, 255), bins=BINS)

        r_hist = convert_to_range(r_hist)
        g_hist = convert_to_range(g_hist)
        b_hist = convert_to_range(b_hist)
        h_hist = convert_to_range(h_hist)
        s_hist = convert_to_range(s_hist)
        v_hist = convert_to_range(v_hist)

        r_lines = print_hist(r_hist, title="Red")
        g_lines = print_hist(g_hist, title="Green")
        b_lines = print_hist(b_hist, title="Blue")
        h_lines = print_hist(h_hist, title="Hue")
        s_lines = print_hist(s_hist, title="Sat")
        v_lines = print_hist(v_hist, title="Val")

        rgb_stats = print_rgb_stats(bgr_img)
        hsv_stats, mode_h, mode_s, mode_v = print_hsv_stats(hsv_img)

        # The following code block referenced
        #
        # https://coding-help.fandom.com/wiki/HSV
        #
        # for determining colour names from HSV, taking into account the
        # fact that OpenCV uses H ∈ [0, 180)
        if mode_v < 11:
            colour_name = "\x1b[1;37mblack\x1b[1;0m"
        elif mode_v > 90 and mode_s < 2:
            colour_name = "\x1b[1;37mwhite\x1b[1;0m"
        elif mode_v > 50 and mode_s < 10:
            colour_name = "\x1b[1;37mgray\x1b[1;0m"
        elif mode_s < 15:
            colour_name = "\x1b[1;37mgray\x1b[1;0m"
        else:
            if 0 < mode_h < 30:
                colour_name = "\x1b[1;31mred\x1b[1;0m"
            elif mode_h < 60:
                colour_name = "\x1b[1;33myellow\x1b[1;0m"
            elif mode_h < 90:
                colour_name = "\x1b[1;32mgreen\x1b[1;0m"
            elif mode_h < 120:
                colour_name = "\x1b[1;36mcyan\x1b[1;0m"
            elif mode_h < 150:
                colour_name = "\x1b[1;34mblue\x1b[1;0m"
            else:
                colour_name = "\x1b[1;35mmagenta\x1b[1;0m"

        data.append((r_lines, g_lines, b_lines, h_lines, s_lines, v_lines,
                     rgb_stats, hsv_stats, colour_name))

    os.system('cls' if os.name == 'nt' else 'clear')
    print("======" * 20)
    for j in range(0, N_SPLITS):
        r_lines, g_lines, b_lines, h_lines, s_lines, v_lines, \
            rgb_stats, hsv_stats, colour_name = data[j]

        for i in range(len(r_lines)):
            if i == 0:
                print(f"\x1b[1;33mSplit {j+1}\x1b[1;0m", end="   ")
            else:
                print("      " + " " * len(str(j+1)), end="   ")
            print(r_lines[i], end="    ")
            print(g_lines[i], end="    ")
            if i < len(rgb_stats):
                print(b_lines[i], end="    ")
                print(rgb_stats[i])
            else:
                print(b_lines[i])

        for i in range(len(h_lines)):
            print("      " + " " * len(str(j+1)), end="   ")
            print(h_lines[i], end="    ")
            print(s_lines[i], end="    ")
            if i < len(hsv_stats):
                print(v_lines[i], end="    ")
                print(hsv_stats[i])
            else:
                print(v_lines[i])

        print("The modal hue:       ", mode_h)
        print("The modal saturation:", mode_s)
        print("The modal value:     ", mode_v)
        print("The colour based on these HSV values " +
              f"({mode_h}, {mode_s}, {mode_v}) is {colour_name}")
    print("======" * 20)


def gst_pipeline_string():
    # Parameters from the camera_node
    # Refer here : https://github.com/duckietown/dt-duckiebot-interface/blob/
    #   daffy/packages/camera_driver/config/jetson_nano_camera_node/duckiebot.yaml
    res_w, res_h, fps = 640, 480, 30
    fov = 'full'
    # find best mode
    camera_mode = 3  #
    # compile gst pipeline
    gst_pipeline = f""" \
        nvarguscamerasrc \
        sensor-mode={camera_mode} exposuretimerange="100000 80000000" ! \
        video/x-raw(memory:NVMM), width={res_w}, height={res_h}, format=NV12,
            framerate={fps}/1 ! \
        nvjpegenc ! \
        appsink \
    """

    # ---
    print(f"Using GST pipeline: `{gst_pipeline}`")
    return gst_pipeline


cap = cv2.VideoCapture()
cap.open(gst_pipeline_string(), cv2.CAP_GSTREAMER)

i = 0
step = None
while(True):
    # Capture frame-by-frame
    ret, frame = cap.read()
    if not ret:
        print("could not get image")
        exit(1)

    w = int(cap.get(cv2.CAP_PROP_FRAME_WIDTH))
    h = int(cap.get(cv2.CAP_PROP_FRAME_HEIGHT))

    # Referenced the following to figure out image decoding:
    # https://github.com/duckietown/sim-duckiebot-lanefollowing-demo
    bgr_frame = cv2.imdecode(frame, 1)  # BGR colour

    # Assuming the bgr_frame size will not change, we need to get the step only
    # once
    if step is None:
        step = int(cap.get(cv2.CAP_PROP_FRAME_HEIGHT) // N_SPLITS)

        if N_SPLITS > bgr_frame.shape[0]:
            shape = bgr_frame.shape
            raise ValueError("N_SPLITS should be <= image height but got " +
                             f"N_SPLITS={N_SPLITS} and image shape {shape}")

    print_img_data(bgr_frame, step)

    sleep(1)
What did I Learn?
What were my main takeaways from this exercise?
- Robots are hard! You tell them to do one thing, and they do the other!
- Pay attention to the instructions! Even small deviations from the instructions can result in your program or robot not working as expected.
- Deal with issues as they arise. If there is a problem with your robot, don’t wait till later to figure it out. The current issue can affect your work in the future.
- If you can’t find help in the documentation, dive into the source code, maybe you can find answers there.
- Not everything works on the first try, you may need to spend some time before getting the results you desire. For example, calibrating my bot’s wheels took a long time and many tries.
- These exercises taught me a lot about Docker. I had never used Docker before but had only used Singularity.